What do to with angled closet floor space?

This may be specific to our home and isn’t all that common. It’s the first house I’ve ever lived in with a closet with no floor. So in the event that you happen to have this annoying waste of space in your closet too, I’m sharing  easy this idea for creating an organized space for wrapping paper storage. Finally…a purpose! 

Organization Idea: wrapping paper storage utilizing angled closet floor space!

It’s in one of our guest rooms. See the closet turned craft space here. I love that it’s handy and organized. I love that my rolls of wrapping paper aren’t crinkled and torn or scattered around the house forgotten. 

I removed the rod for hanging clothes and added shelves for storage earlier this year but the angled floor from the staircase to the basement below is annoying. Here’s what I did: 

Organization Idea: wrapping paper storage utilizing angled closet floor space!

I placed the rod I removed below. It’s just sitting there to support my rolls of wrapping paper. Brilliant, right? No rod? How about a piece of scrap wood? PVC pipe? A broken broom handle? And actually, I don’t really even need a support since the door frame could hold in my rolls of wrapping paper. 

Organization Idea: wrapping paper storage utilizing angled closet floor space! Organization Idea: wrapping paper storage utilizing angled closet floor space! Organization Idea: wrapping paper storage utilizing angled closet floor space!

Okay, so not saving the world or anything but it is a happy little space-saving idea! Am I the only one with this sort of closet floor or does your home possess the same awkward space? 

Organizing a Craft Closet

Happy New Year, DIY Friends! Kicking off 2016 with a DIY organization challenge!#michaelsmakers diy organization challenge

Every January, I find myself wanting to declutter and get organized around the house. I do have a craft room upstairs that acts more as a storage room because I find that I prefer crafting on the dining room table. I’m more productive when I’m working where things are going on which inspired creating a craft closet in the guest room right off the dining room. 

closet before…DIY craft organization challenge craft closet #michaelsmakers @diyshowoff

I emptied the closet full of forgotten and unworn coats and added some shelves.DIY craft organization challenge craft closet #michaelsmakers @diyshowoff


I still want to paint but my favorite part was shopping Michaels newly launched line of storage and organization products called Cre8ted Spaces available in stores now. Tons of different colors, bins and office supplies – with more than 300 new items in 4 coordinating colors. You have to check it out! 

DIY craft organization challenge craft closet #michaelsmakers @diyshowoff

As a part of the Michaels’ Makers January DIY Organizational Challenge, an unused closet makes crafting on our main floor in the dining room with my most used craft supplies for essential oil business and gifts so much easier, making working more enjoyable!

DIY craft organization challenge craft closet #michaelsmakers @diyshowoff

I LOVE the gorgeous color and that there are so many fun different boxes, drawers, baskets and pencil cups to hold and organize my supplies. 

DIY craft organization challenge craft closet #michaelsmakers @diyshowoffDIY craft organization challenge craft closet #michaelsmakers @diyshowoffDIY craft organization challenge craft closet #michaelsmakers @diyshowoff

Where do you craft? In a designated craft space? The dining room or kitchen table? The living room floor? Do you find yourself digging around an unorganized storage space?Need some more motivation and inspiration to organize your craft space? Take a look at more storage projects on Michaels.com or the other 49 makers’ ideas on The Glue String for tips on designing, organizing and decorating their favorite places starting today at 10 a.m. CST!

#michaelsmakers diy organization challenge

 Loading InLinkz ...

Inspired to organize your own space? Start the year off right! Michaels has tons of products and storage supplies that can be used to decorate and inspire creativity in any room of your house or office.

DIY Freestanding Mobile Pipe Coat Rack

Holiday season! That means some entertaining in our home, get-togethers with families, dinner parties (having a holiday open house today, in fact).  Time to get holiday guest ready! Did you ever notice that your own family fills up the coat closet (sometimes to the point of “avalanche!” when opening the door? Or is that just us?!)…and when guests arrive in colder months, coats are stored in the guest bedroom in a pile on a bed? Our solution: 

DIY galvanized pipe and wood mobile coat rack on casters @diyshowoff #lowescreator

A DIY moveable, mobile coat rack. I am so over the utility types that teeter, lean or fall over when filled up. Know what I mean? This industrial looking DIY coat rack is sturdy, not to mention adds a touch of rustic industrial style.

Materials I used:

  • (1) 48 inch stair tread (I used red oak but for a more budget friendly option, there was also pine)
  • Rust-Oleum Ultimate Wood Stain (color is kona and ebony)
  • foam brush for applying stain, gloves & rags, paint brush for applying polyurethane
  • Rust-Oleum Polyurethane sealer (finish is satin)
  • (4) heavy duty casters 
  • (2) 3/4″ flanges
  • (2) 24″ galvanized steel pipes
  • (2) 30″ galvanized pipes
  • (2) 3/4″ tee connectors
  • (2) 3/4″ nipple connectors
  • (2) 3/4″ 90 degree elbows
  • (2) 3/4″ 90 degree street elbows
  • (2) 3/4″ caps
  • (1) 36″ galvanized pipe
  • #12 1 inch hexagon washers (screws)

DIY galvanized pipe and wood mobile coat rack on casters @diyshowoff #lowescreatorDIY coat rack with galvanized steel pipe and casters @diyshowoff

What I did:

Soak the sticker parts of the galvanized pipes in hot soapy water. (It doesn’t take long.) Remove stickers. Dry pipes and set aside. 

DIY galvanized pipe and wood mobile coat rack on casters @diyshowoff #lowescreator

Finish the wood. Using the foam brush, I applied the wood stain (brush on in the same direction as the wood grain). Let sit for a few minutes then wipe away the excess with old rags. Unlike pine, the red oak wasn’t absorbing my favorite kona colored stain in as rich of a color so I also applied two coats of ebony in the same way to achieve a darker color. Stain then dries in about an hour. 

DIY galvanized pipe and wood mobile coat rack on casters @diyshowoff #lowescreator

After the stain was dry, I sealed the wood using a coat of polyurethane. Simply brush on (looks a bit milky when wet but dries clear). I let that dry overnight. 

I attached the four casters to the under (unfinished) side using the hexagon screws. Be careful with the screws on the cut side of the wood. Going too close to the edge may cause the wood to crack. 

DIY galvanized pipe and wood mobile coat rack on casters @diyshowoff #lowescreator

Flip right side up. Set aside the nipple connectors, two street elbows and the caps. 

Next I assembled my pipe pieces. Starting with the flanges. Screw 30″ pipes into flanges.

DIY galvanized pipe and wood mobile coat rack on casters @diyshowoff #lowescreatorThen add tees to the other end of each 30″ pipe.

DIY galvanized pipe and wood mobile coat rack on casters @diyshowoff #lowescreator


Then add the other 30″ pipe sections (one to each tee – you’ll have two poles at this point).

DIY galvanized pipe and wood mobile coat rack on casters @diyshowoff #lowescreator

Add a 90 degree elbow to the top of one pole.

DIY galvanized pipe and wood mobile coat rack on casters @diyshowoff #lowescreator

Connect the 36″ galvanized pipe (center) piece. Add a 90 degree elbow to the end of the center pipe piece then add the other pole.  

DIY galvanized pipe and wood mobile coat rack on casters @diyshowoff #lowescreator

Place the pole-contraption onto the wood stair riser (I found the center by using a yard stick).  Attach flanges to the wood using the hex screws.

DIY galvanized pipe and wood mobile coat rack on casters @diyshowoff #lowescreator

Add nipple connectors to the center tees, then elbows then caps. This creates a space for hanging purses, hats or scarves. 

DIY galvanized pipe and wood mobile coat rack on casters @diyshowoff #lowescreator

Now when we’re expecting guests, we can simply roll the coat rack near the door for hanging coats. Or use it as extra hanging space in a room without a closet (or one with a packed closet). Handy to have in the laundry room too! 

DIY galvanized pipe and wood mobile coat rack on casters @diyshowoff #lowescreatorDIY galvanized pipe and wood mobile coat rack on casters @diyshowoff #lowescreator

Store it in the basement, a closet, the laundry room, an office or guest room and then move near the door for parties and gatherings. Or if you have room, display near the front door entryway or mudroom area. 

DIY galvanized pipe and wood mobile coat rack on casters @diyshowoff #lowescreator 

DIYShowOff #lowescreator

I received a Lowe’s gift card to put towards this challenge. Opinion and above idea is 100% my own. More DIY ideas at Lowe’s Creative Ideas or follow Lowe’s on InstagramPinterest and sign up for the Creative Ideas magazine and app.

Thrifty Bathroom Counter Organizer


Thrifty bathroom counter organizer (this would be cute on a desktop in my home office too)…bathroom organizer at diyshowoff.com 

Materials:

  • Thrift store scores: mismatched vase, ceramic jar with lid, tiny dish and tile trivet
  • RustOleum FlexiDip (removable rubber coating in gray) or spray paint

DIYShowOff bathroom counter organizer materials

How to: Clean and dry ceramic pieces. Apply 4-6 light even coats allowing 5 minutes dry time between each coat. Let dry overnight. Optional: Glue pieces together with an epoxy glue. Rubber coating is removable (within three months) when adhered to plastic, metal and glass…pretty cool! 

DIYShowOff bathroom counter organizer materials

That’s it. I love the matte color, texture, that if I had used something ‘precious’, I’d be able to peel away the rubbing coating, and that it’s waterproof too. 

bathroom counter organization at diyshowoffbathroom organizer at diyshowoff.com

See the bathroom reveal here

Painted Storage Box Craft

Organizing the desk top / homework station for the back-to-school season? A small storage box keeps school and homework accessories within easy reach but not on display. 

painted box craft idea at diyshowoff.com

Materials:

painted box craft idea at diyshowoff.com

What to do:

Tape off a design using your FrogTape. Stripes, checkers, plaid, triangles. So many options!

painted box craft idea at diyshowoff.com

Using a credit card, gift card or just your own thumbnail, burnish the edges of the tape. Meaning: make sure the edges of FrogTape are good and stuck down with no gaps.

painted box craft idea at diyshowoff.com

Now the fun part: paint each section. YOU customize colors to coordinate with decor or season.

painted box craft idea at diyshowoff.com

While paint is still wet, carefully remove FrogTape. Then let the paint dry.

painted box craft idea at diyshowoff.com

Give it a quick light spray of lacquer and let dry.

painted box craft idea at diyshowoff.com

*Optional: embellish with washi-tape and decoupage, add a drawer knob, drawer pull or leather handle, adhere something from the junk drawer or little plastic animal using hot glue, add vinyl decals or stickers. Get creative! painted box craft idea at diyshowoff.compainted box craft idea at diyshowoff.com

Use as a pencil box, for keepsake treasures, to store note or recipe cards, for organizing an essential oils collection, to tuck on a bookcase filled with bookmakers and highlighters, to keep cords handy or for a unique way of wrapping gifts.

painted box craft idea at diyshowoff.com 

It’s perfect for storing 70 15ml Young Living essential oils (more if you’re mixing in 5 ml sizes). Great idea for incentives, prizes or gifts – and YOU customize it to coordinate with your home. 

Young Living essential oil storage box @diyshowoff


FrogTape Blog Squad

Disclaimer: I received compensation to complete this project for using FrogTape® products. All opinions, projects and ideas are based on my own experience.

DIY Hanging Organizer (for peg hooks)

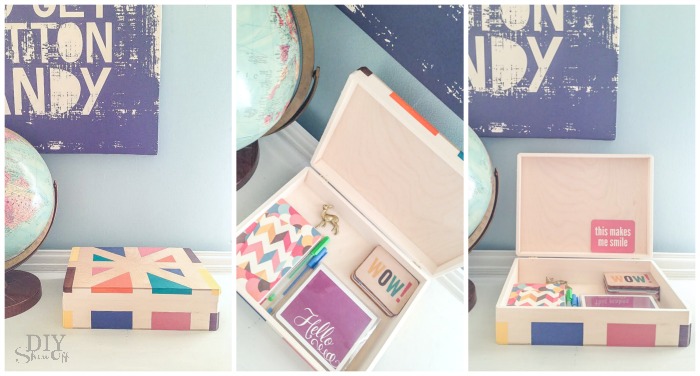
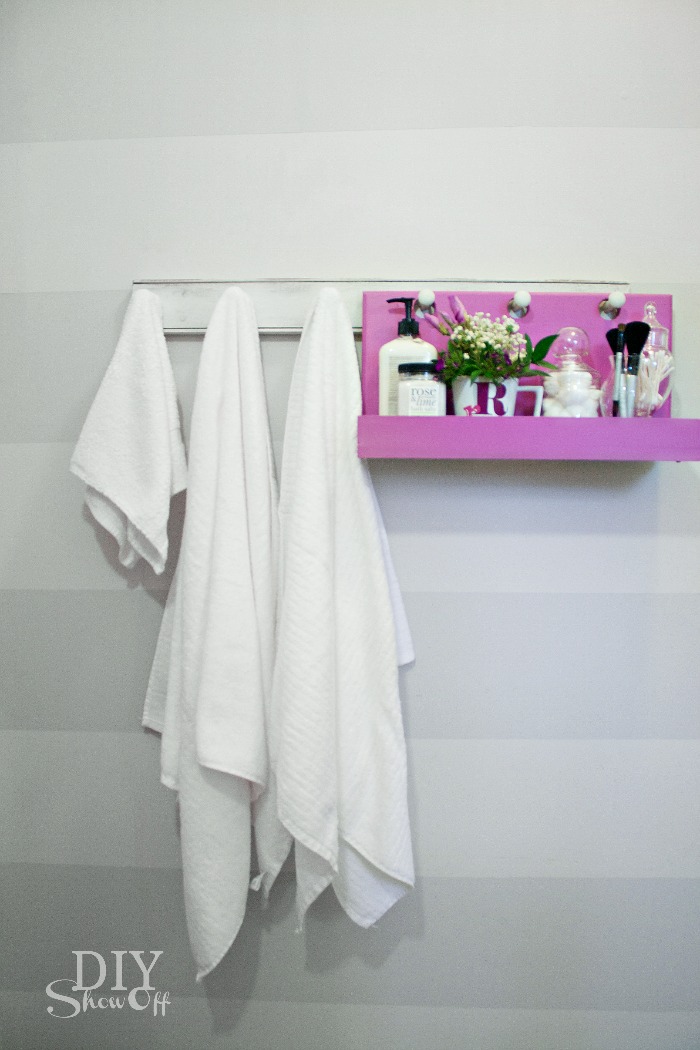
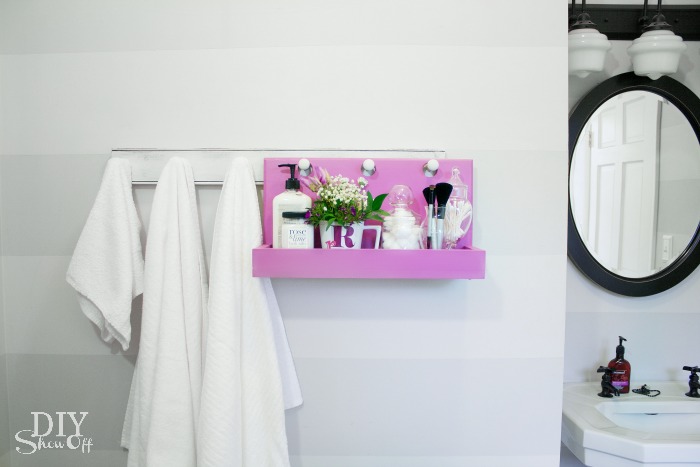
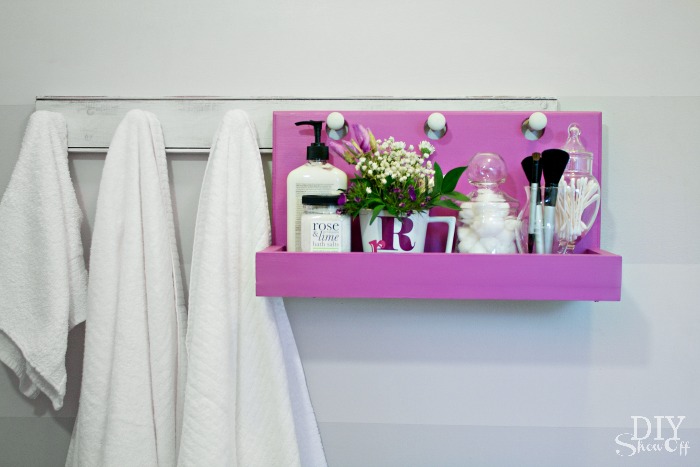
How do you add a fun pop of color to an otherwise neutral room? Try Pantone’s Color of the Year for something you may not normally choose. The Lowe’s Creative Idea March challenge was to use Valspar’s Radiant Orchid. Just a small touch adds elegance to my white and gray space. 

Pantone Color of the Year Radiant Orchid

Inspired by PB’s Gabrielle system, I created a wooden peg hook organizing caddy from scrap wood. 

DIY Hanging Organizer Tutorial

Materials I used: Most of my wood was purchased at Lowe’s and is left over from previous projects with the exception of the .50 yard sale find piece shown below. Adjust measurements according to your own needs or scrap wood measurements. Inexpensive pine works well for this project.

  • 1″ x 10″ x 18 1/2″ (back)
  • 1″ x 6″ x 18 1/2″ (bottom)
  • 1″ x 2″ x 4″ (sides)
  • 1″ x 2″ x 18 1/2″ (front)
  • 1″ deep (or however thick your peg hook rack is)  x 1″ tall  x 6″ wide (back stop piece)
  • Gorilla Wood Glue
  • 1 1/2″ wood screws
  • Wood filler
  • Valspar Radiant Orchid 

What I did:

Mark the center top of the back piece of wood. Hold up to a peg on your coat rack, lining the center with the center of a peg. On the wood, mark the center of each peg placement.

DIY peg hook caddy tutorial

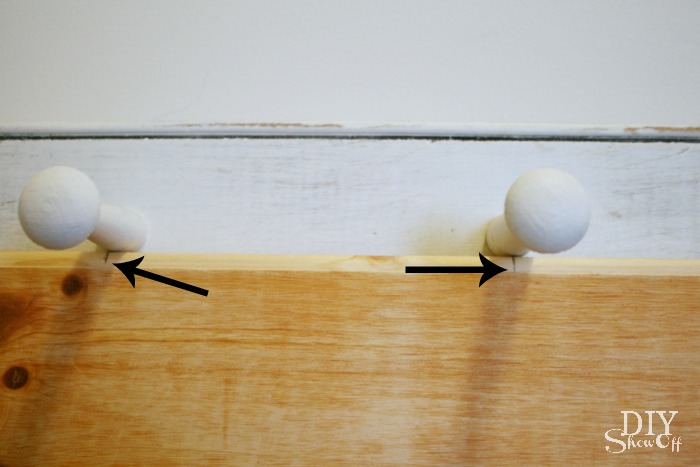
Decide which hole saw bit is just a little bigger than the pegs. 

DIY peg hook caddy tutorial

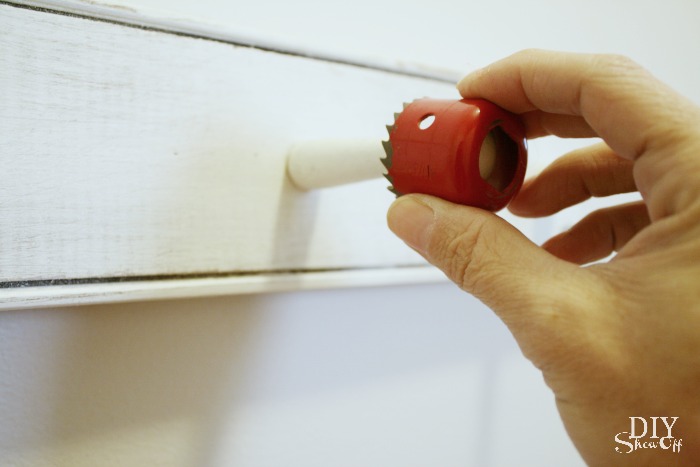
You’ll want your holes to be near the top end. I used a ruler to measure down about 2″ from the top and a level to make a cross mark to show the center of each hole. Drill tiny pilot holes where the pencil marks meet.

DIY peg hook caddy tutorial

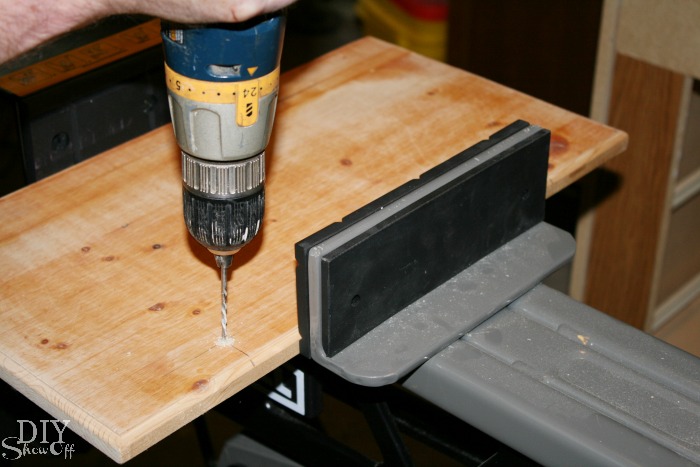
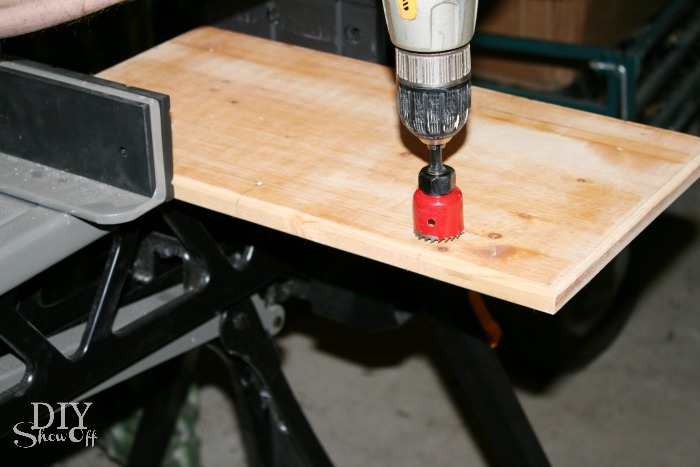
Attach the hole saw bit to your drill and using the pilot hole as a guide for the center drill bit, drill/cut holes. I think our hole saw bit is a little dull so the back side of my wood is splintered. (Thankfully no one will see that side!)

DIY peg hook caddy tutorial

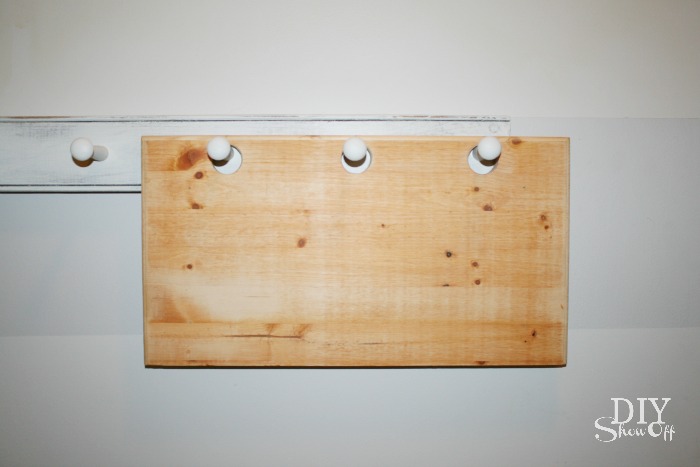
Sand and wipe clean all wood pieces. Hang on pegs to ensure holes line up.

DIY peg hook caddy tutorial

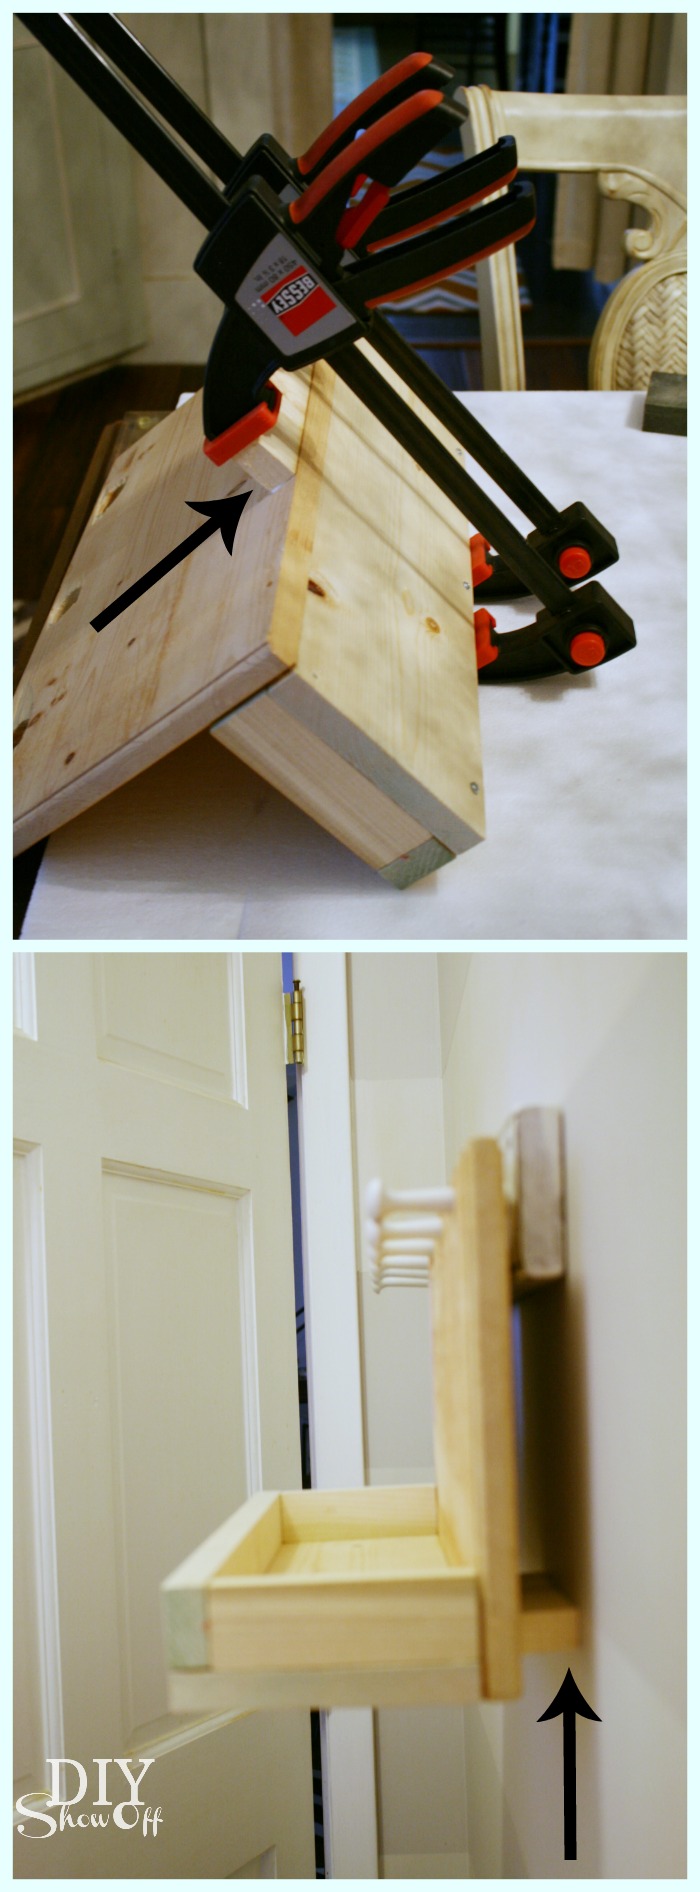
Using wood glue, wood screws and clamps, assemble your caddy and let dry. I attached my screws from the bottom and back so they weren’t seen but you could also countersink screws, fill and sand.

DIY peg hook caddy tutorial

I thought that was it for the construction until I tested it hanging on my peg hooks. Oops, front heavy. Using just wood glue and a clamp, I attached the back stop piece to the center bottom of the back. This ensures that the caddy will hang level.

DIY peg hook caddy tutorial

Using wood filler, fill all seams and cracks. Let dry, sand smooth and wipe clean. 

DIY peg hook caddy tutorial

Paint the entire wood caddy. Mine took two coats. Radiant Orchid wouldn’t have been my first choice but it’s growing on me and it’s nice to do something bold and fun for a change. I love the Valspar sample size paint…more than enough and perfect for adding colorful accents. Down the road all it takes is a new coat of a different color to re-freshen things up. 

DIY peg hook caddy tutorial


Now I have a shelf/tray for decorative items, toiletries in the bathroom

bathroom organization - DIY peg hook hanging shelf

DIY hanging peg hook organizer

hanging peg hook organizer

bathroom peg hook hanging organizer

Great for keys, wallet, sunglasses, change, cell phone near the door in the mudroom or entryway. 

Peg Hook Hanging DIY Organizer

DIY peg hook mudroom entryway organizing hanging caddy

PB inspired peg hook shelf caddy organizer

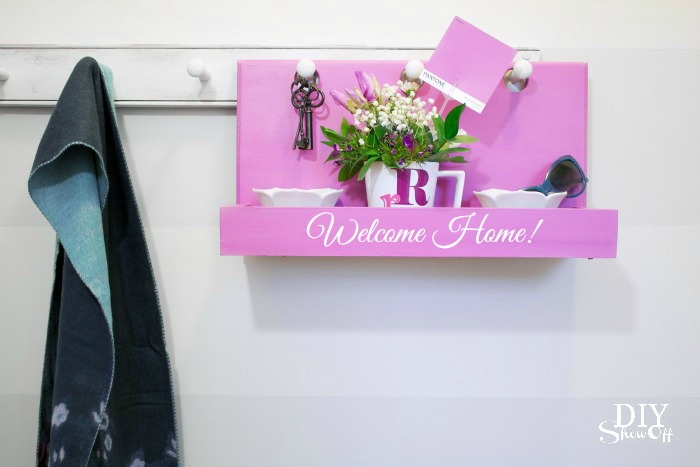
My peg hook is located in my bathroom but I’d really love to have something like this near the door as well. How about you? 

More DIY ideas at Lowe’s Creative Ideas, follow Lowe’s on InstagramPinterest and sign up for the Creative Ideas magazine and app!    

LCI

*Disclaimer: As a member of the Lowe’s Creative Ideas Creators and Influencers network, I received a Lowe’s gift card to complete this challenge. As always, all ideas and opinions are in my own words. The blog post above is what worked for me. Results may vary. Remember to work in a well-ventilated area and to take the proper safety precautions.